

My latest purchase was a new antenna dedicated to the civilian airband 108-136 MHz.
I had made J-Pole antennas before using ladder line, heavy copper wire and scrap copper pipe and even speaker wire but all were rough and ready types not very much in the way of care was taken in the construction. The ones I had made were functional , and all were made for loft mount or in the case of ladder line & speaker wire versions, thrown up in a hotel window frame when travelling. The j-pole is an easy DIY antenna , it offers good performance if you just need one section of the VHF or UHF band.
Here are some variations of the J-Pole antenna design.

Variations of the J-Pole Antenna Design (Attribution Wikipedia).
Looking around some amateur radio forums I noticed one company name came up quite a lot with many positive reviews, Superyagi Antennas right here in the North West of England, U.K.
A small home based antenna construction company run by Kevin, a fellow radio amateur based in Clithroe, Lancashire.
I contacted Kevin the owner and requested a custom build of one of his J-Pole antenna models with centre frequency of around 125 or 126 MHz as this is right in the centre of the civilian airband allocation of 108-136mhz.
Kevin said he could do it, and £42 was the fee, so I paid up and waited for the item to arrive.
I received a message first thing the next morning to say the item was on way, wow that was quick !
Here is the antenna as unpacked, the tubing used is aircraft grade aluminium tubing.
The antenna is taped to a wooden support for transit to prevent bending/breakage.

The smaller single tube bears a line made with a permanent marker pen.

This is the tuning mark set at final commissioning in Kevin’s home “antenna factory”. That is the sweet spot for the 125/126 MHz reception I wanted. We will need that mark later on.
Here is the tuning graph/output from Kevin’s VNA mini analyser when he constructed my antenna.
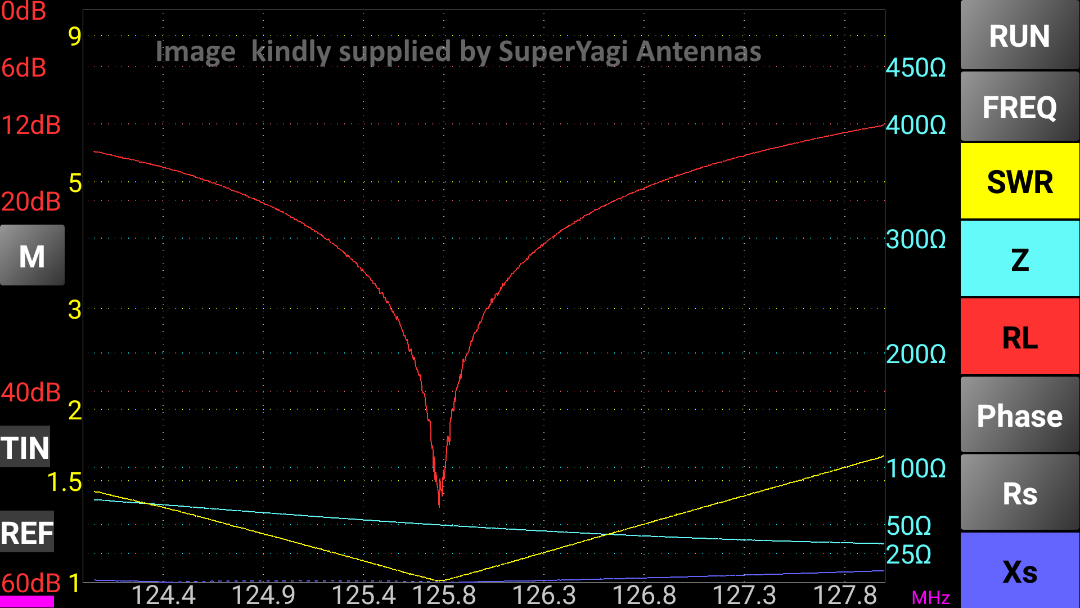
As you can see the antenna best performance is right in the zone I wanted 125.7 MHz to be exact, this will be just great for my needs.
These specifications should be fine for receiving the entire civil airband , but optimum performance will be right in the centre of it.
First of all, As the antenna arrived very quickly, I was short of small diameter 50 ohm antenna coaxial cable and PL-259 plug connectors to match. These are on order, but had not arrived here yet so I had to knock something up for the purposes of testing.
Warning : Radio Perfectionists look away now….
Go and get a coffee or something. If you carry on looking at the next 2 or 3 photos, feel free to bat yourself about the face with a wet sponge at will !
All as I could find in my box was a compression PL-259 connector with an inch of Times Microwave RG-214 cable attached to it, salvage remnants of one of my previous amateur radio antenna installations. I stripped back the sheath to expose the centre core and braid.

The only small diameter coaxial I had was from an old Sky +HD installation, about 15 mtrs of Webro twin axial “shotgun” style mini coax. Each mini coaxial is around 4.5-5mm diameter. Horrible cheap stuff really with an Alloy foil screen (nothing like Webro Twinsat WF100 copper which is much better). This mini stuff is made to a price on bulk for Sky engineers. I separated/unzipped it as I only need one coaxial for testing. It is much smaller than the RG-214 which comes in @ around 11mm diameter.

I made up a quick soldered splice joint, not by any means perfect…

Satellite TV coaxial is 75 ohm impedance and the larger Times RG-214 is 50 ohm. Again not perfection.But, needs must. The soldered PL-259 joint was sealed and bound with electrical tape, then the whole cable tested for continuity, The results were all good no problems or shorts so that is my test coaxial sorted out.
On the other end of the Webro Sat TV coaxial, an F connector and an adaptor F to BNC for the receiver.

Lets move on and assemble the Super-Yagi j-pole antenna (Civilian Airband Version).
Slide the smaller tube into the aluminium ferrule on the larger section. Insert it up to the tuning mark so its just visible.

Tighten the 2 screws until they just bite and then just a fraction more.
Check the smaller tube is secure and does not move or slide into the spigot further losing the optimum tuning/performance.
Tip : A small wrap of clear tape on the shorter tube at the tuning mark will stop it sliding into the coupling when you are fixing the screws, you can leave it in place when you are done if you like.
Next attach the coaxial to the antennas SO-239 connector, here I made a rough and dirty current balun with 4 turns of the feeder coaxial about 90mm diameter close to the antenna.
When assembled the antenna is around 1.67mtrs / 66 inches in length.

Here are some close up photos, Im impressed with the quality of the build and materials used. It certainly built to last.
Top quality tube clamps.

Around the back.. Nylock style Locking nuts, and standard size/TV mast clamps.
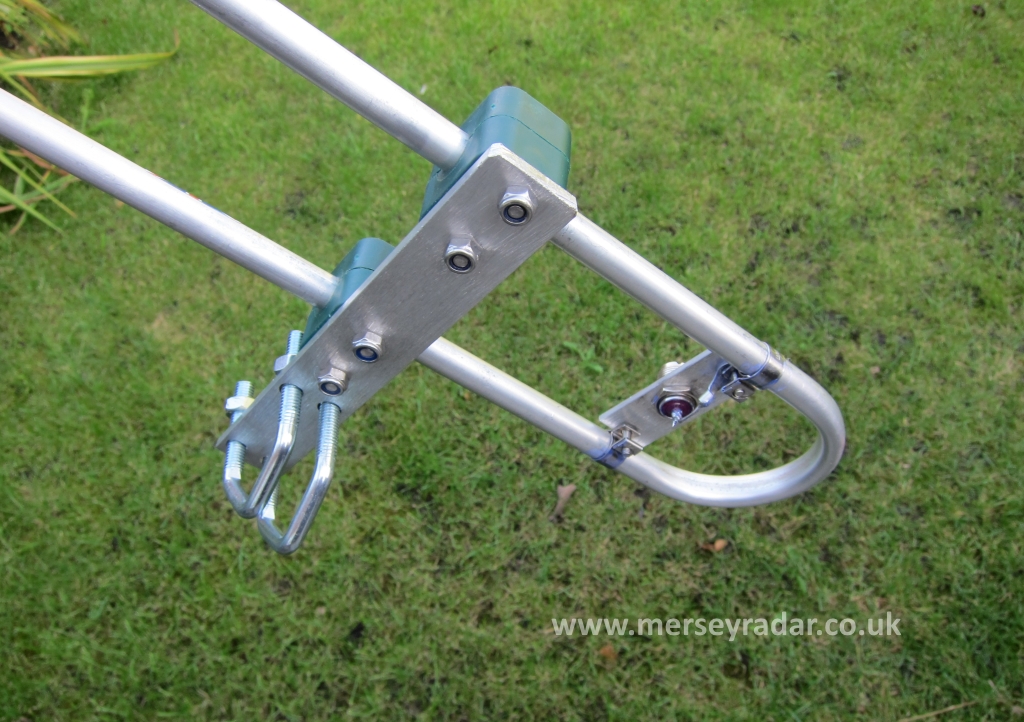
The SO-239 connector interface.

The rear of the connector is sealed with a coat of Electrolube TRV varnish to protect from the natural elements.

Okay, with the antenna now fully assembled its time for a quick test.
I took the antenna upstairs and mounted it in the loft space near the opening hatch.
Unfortunately close to the hatch, the loft space is not high enough for the antenna too fit in vertically which would be the preferred way, so I fitted it in at around 45 degrees from the vertical with the longest element touching a wooden purlin and the bottom curve balancing on a wooden ceiling joist. Again not perfect, but it will do for now.
I linked the SuperYagi up the Yupiteru MVT-7000 scanner which I repaired recently.
Here is a short video of the reception.
Thats certainly more than acceptable considering the compromises made with the feeder cable and mounting location/orientation.
I am more than happy with it.
I am now considering my options for a more permanent installation when my cable & connectors order arrives. Perhaps tying a cord with a loop to the top of the longest element and suspend on a strategically positioned screw or cup hook in the centre of the loft space where the antenna will fit in fully vertical, or go for it and install this antenna on a TV type mast outside. Winter is approaching and although this antenna is certainly constructed to a standard where it would survive the very worst our unpredictable British weather could throw at it, I am favouring the loft option as a semi-permanent install until perhaps spring next year.
A quick word on masts and brackets, mounting hardware and suchlike. Remember when you mount an antenna outside, up quite high and relatively inaccessible, you want it to stay there, in all weathers.
Before you head off down to your local Screwfix or DIY store, or commission an aerial installer, there are a few things you should consider. I found this very informative web page from a supplier based in Sheffield, England,UK (A City also known as “Steel City”…very apt !).
http://www.aerialsandtv.com/poles-&-masts.html
If you fancy some entertainment ,There are some very amusing stories on this website in the “Cowboys Locker” section. I havent laughed so much at anything technical for ages, the pages below should be compulsory reading for all aerial installers worldwide. If you have a technical/engineering interest, even in a hobby capacity, the links below will provide you with a pick “me up” tonic, Guaranteed !
http://www.aerialsandtv.com/cowboyslocker.html
and
http://www.aerialsandtv.com/cowboyslocker2.html
This is another example of a supplier who knows what they are doing and knows a lot about what they are selling.. Thank goodness there are people out there who will stand by what they supply !
If you are thinking of ordering one of these antennas , SuperYagi Antennas have an ebay store, just search for the airband models within the store to find the J-Pole featured (Link Below) .
Kevin has now started production of this J-Pole model for civil airband and a Slim-Jim design for UHF military airband, and a dual band 126/300mhz J-Pole and to meet the requirements of aviation enthusiasts like me. The slim jim for military airband has a centre frequency of around 300 mhz which would make the longest dimension around 72cm I think.
I could have constructed my own J-Pole but if I made it to this standard the cost of the components would probably exceed the £42 price paid , it would certainly be very close to it when postage of the various parts is taken into account.
If this antenna is not listed on Kevins ebay store, use the “send message to seller” facility in ebay and I am sure that he will accommodate your requirements.
Well done Kevin at SuperYagi for constructing my “one off” bespoke special order antenna. It was on my doorstep within 48 hours of my initial request and subsequent payment, In today’s marketplace, it doesn’t get any better than that.
Its great to see a small cottage industry manufacturing high quality goods based right here in the North West of England.
Update March 2019,
2 additional New Superyagi Airband antennas were passed on to me for evaluation / review.
Here is the link to that page
http://www.merseyradar.co.uk/airband-radio/2-more-airband-antennas-from-superyagi-reviewed/
Would you like to make your own civil or military airband antenna ?
If so, try this link
http://www.merseyradar.co.uk/airband-radio/home-made-coaxial-dipole-antenna-for-civil-airband/
[…] http://www.merseyradar.co.uk/airband-radio/superyagi-civil-airband-antenna/ […]
[…] SuperYagi Airband Antenna. […]
Just came across your excellent site after getting interested in ADSB and Air Band. Thank you for all the information and superbly written articles.
Hi There Kev,
Many Thanks for your kind comments and taking the trouble to write in, it is much appreciated.
Mike
Hi, I’m new to this game!
Thanks to your great info I’ve made a couple of bazookas and dipoles which appear to work well with UBC125XLT scanner for airband. Would diameter of conductors have an influence – I read that larger diameter tubes help with dipoles, so I’m thinking of a bazooka made with concentric alloy tubes suitably insulated, rather than co-ax, I’m thinking of 12mm and 6mm, any thoughts, would it be a discernable improvement?? Maybe my bits of tube would be better used for alternatives……
There are so many options to purchase out there, I could spend a king’s ransom trying them all!!
Hello Paul,
The trouble making alloy tube bazooka are 2 unknown values for the calculations you will require when designing the antenna.
1. The Velocity Factor of the tube in situ with whatever insulator/make shift dielectric you choose such as expanding foam for instance (VF Mentioned in this article)
2. The capacitance between the inner and outer alloy tubes (presumably spaced in “free air” instead of a plastic dielectric when using coaxial). When using higher quality coaxial, most manufacturers state the capacitance per foot and the VF in % or as a decimal.
This article uses RG213 or RG8, both of which have known values so we can use these and the bazooka calculator to create a good all round antenna for your band of interest.
If you are a newbie to antenna building substituting materials would be a very big ask, far too much experimentation and tweaking to complete IMHO & perhaps too much and the rewards may not be as fruitful as you would like. Thanks for taking the trouble to write in.