

This is an unusual antenna in my collection, the PA0RDT active mini whip. Normally I would be sceptical about the performance of such a small device for HF use but I read a few favourable reviews on the internet and decided to order one for using with my Tecsun PL-600 ssb radio and I thought it would be handy for trying with sdr-radio using a standard r820t2 usb dongle and spyverter HF upconverter combination.
It should be said that this design is very popular amongst the DIY / Homebrew community and the use the makers original design and use their own locally sourced components. Its a nice little project to build and experiment with I suppose.
So , to save any confusion,This one is the original PA0RDT mini-whip so to speak.
The antenna is designed and each one is custom built by Roelof Bakker (callsign PA0RDT) a radio amateur from The Netherlands. Many of Roelofs customers like listening to the lower frequencies, this antenna seems to have a loyal following with LF/Broardcast AM radio enthusiasts as well as regular HF ssb listeners. The units can be ordered direct from him via email . roelof@ndb.demon.nl The cost when I purchased it in 2017 was €39 euros plus €9 euros shipping to me here in the UK. Payment was made by Paypal.

The PA0RDT mini-whip for HF.
The parcel was packed with great care (top marks for packing) and the unit arrived in about 7 days from date of ordering. Roelof makes these to order, I dont think he has too many units ready to go but he keeps the component parts and makes the units up as and when he receives orders.
Each one is tested for operation on the air by Roelof before dispatch.
Here is the layout diagram of the unit attached to a HF receiver.

Connection of the mini-whip to a HF receiver.
And outside , best performance is achieved if the antenna is mounted on a non conductive pole and the braid of the feeder coaxial has a connection to a good RF ground.
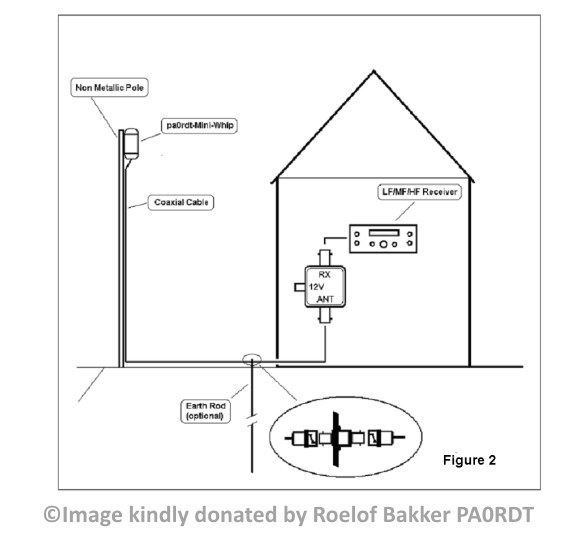
Best Performance Configuration.
(note the grounded coaxial outer braid on the feedline and non-metallic mast for the whip)
This is to prevent unwanted signals being received, this unit is very sensitive.
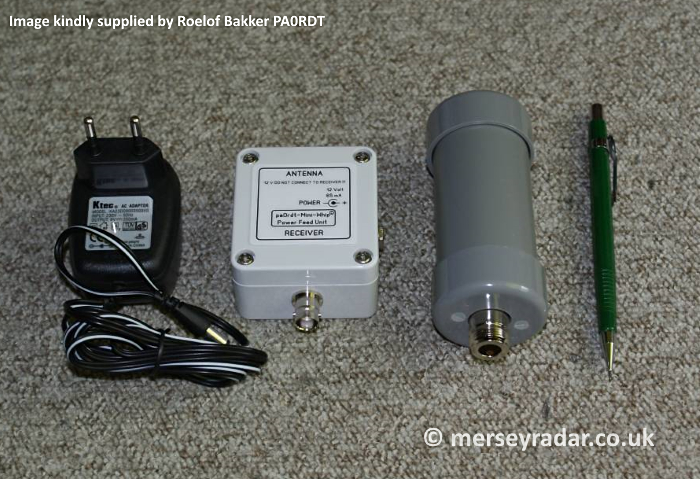
Next up, Some photos of my unit.

Antenna whip and power unit.
On initially opening the parcel I was impressed with the quality of the components.
The enclosures were robust and you could tell that these units were not made by Roelof purely for profit. A considerable amount of care had been taken by him to choose items that would last. If you were to purchase the items yourself and “go homebrew” and construct this yourself, I suspect that the components themselves would cost you upwards of €30 euros if you were to attempt to match the quality. Connectors and enclosures are not cheap nowerdays..
Roelof obviously does not make a fortune out of selling these units ( In reality he probably would get enough for a pint of fine Dutch beer or perhaps two out of the profit made on each unit) but he has a small cottage industry supplying radio enthusiasts with goods that he cares about and this shows in the very neat construction which is great to see.
Here is the schematic diagram.

The schematic Diagrams for Power unit and Whip.
Here is a closeup of the power feed unit.

Power Unit (BNC version).
Note the 12 volt DC socket on the side of the enclosure, also the small wound ferrite transformer which is a relatively new component.
And the small active whip totally enclosed to protect the circuitry from the outdoor environment.

Active Whip (SO-239 version).
Performance wise, I was pleasantly surprised. I linked this up to the Tecsun PL-600 field day style for experimentation with about 10 metres of coaxial between the whip and the power unit. The whip was fixed for testing temporarily using cable zip ties on to a 1.2 metre long electrical PVC conduit at one end and the other end put onto the ground.
For an antenna standing at just 1mtr above the lawn in my garden. The mini-whip received Shanwick Volmet transmissions very well on 5.505mhz USB and Royal Air Force Volmet on 5.450mhz USB. I should point out that in my opinion you should not try this antenna indoors or in a loft for example as it is very sensitive to all signals, this includes interference from your house mains wiring and electrical appliances so keeping a good distance between the whip and power injection unit gives best results.
There is a caveat however, the longer you make the feeder coaxial, the more chance you have of the coaxial feeder braid becoming a “phantom” antenna and will result in the receiving of unwanted signals.
Attaching the braid side of the coaxial connector to a good RF earth (as per the makers diagram) will minimise this though.
As per the diagram further up the page, I obtained even better results when I grounded the braid/shield of the 10 metres of coaxial.
I continued to monitor this experimental setup during a few weeks in winter (December) and I found that the HF aero night reception on 3 & 5 mhz was particularly good.
With all things taken into account, The PA0RDT mini whip is a great antenna for slinging up if you are on a field trip and supply 12vdc power from a vehicle or vehicle battery, the unit has very low current consumption. Apartment dwelling radio enthusiasts may like this if they have a small balcony or similar to mount the whip outdoors.
The mini-whip is most definitely NOT in the same league as my G-Whip receive antenna which is brilliant but not so compact… Read about that item below
http://www.merseyradar.co.uk/?p=290
If you are thinking of using the PA0RDT mini-whip as a base station antenna, be prepared to experiment lots with various positions of the active whip to obtain optimum results.
Each station location will be different, there is no set ideal world situation with this antenna its all about experimenting..(which is fun) and finding that little area where the mini-whip will work best in your station location .
Radio is all about experimenting with your station to get the very best results from your equipment and to gain new knowledge from such experiments.
I would love to try this with something like an airspy HF+ sdr receiver, or an airspy r2 with my speyverter its compact design and small power requirement lends itself to SDR applications.
I have tried it with one of my rtl820t USB dongles and airspy spyverter , results were quite good but you cant expect too much from a $10 dongle.
I imagine that running one of these with a short feeder coaxial to an outbuilding (example: garden shed or garage) or an apartment balcony with a top class sdr radio receiver running /raspberry pi/ spyserver or similar would work extremely well.
Alternatively those with limited space to mount longer antenna designs may find this very useful indeed.
A small and very minor blip but I will point it out for the record,
At some point during construction, there must have been an over spill of epoxy resin on to the cover cap of the whip enclosure. It has been sanded down and finished flush but cosmetically, it is not perfect. BUT.. it is most certainly weather sealed which is far more important.

Very minor cosmetic flaw.
The mini-whip is available in 1xN type/ 2x BNC , 1x SO-239/2x BNC and finally all 3 connectors in BNC.
The 1x N type/ 2x BNC is shown below.
N Type to BNC version shown with EU power supply.
Typical connection to my Tecsun Radio with a short stub of coaxial shown to the whip for demo, the one in situ at my station is much longer.
By design the power unit has no voltage present at the receiver side of the Power Feed Unit when power is applied to the DC socket via a 12v source.
For extra safety and to protect your radio, you could use a capacitor for dc blocking on the receiver patch lead.
There are commercial F type connector DC blockers used by TV/SAT engineers and these are easy to find on online auction sites beginning with the letter E, or big online stores beginning with the letter A.
It should be noted that there will be some insertion loss when adding a dc blocker.

PA0RDT Connection to Tecsun PL-600 detail.
Connection using a 3.5mm mono jack for Tecsun radios, I have another lead with mcx connector its easy to change this lead for mcx type for R820t dongles.
If you wish to order a unit, contact the maker Roelof Bakker (PA0RDT) via email (link below)
Update August 2018,
I there is a revision to the unit shown in my post above.
The latest model features a power on LED on the injector unit which is very handy.

The new Power Feed Unit design with LED (August 2018).
Note the use of Amphenol Branded BNC connectors, Nice quality !
The whip unit is totally weather sealed , the cover caps are glued in place with resin so not easy to see inside.
For the inquisitive, I asked Roelof if he could supply a few photos of the inside of the whip.
He very kindly donated some images below, and a closeup of the components used.
As you can see, a mix of surface mount devices and traditional through hole components.
Very neat soldering work I must say !

PA0RDT Whip section internals.

Closeup of components

Roelofs PA0RDT Mini-Whip is very affordable given the high quality components used. There is considerable care evident in the design and construction. It represents excellent value for money.
There are much more expensive active antenna choices like the Bonito Mini Whip and Wellbrook models and much less expensive ones such as the Degen DE31MS active loop.
For little in the way of investment, The PA0RDT mini whip is certainly worth a try if you are short of space to erect larger antenna systems for listening around the HF bands.
It occupies a section of the market between the two extremes of price and offers great build & good performance for a general coverage HF listener.