

I have a soft spot for the MVT-7000.
I have a little collection going on of this amazing machine. Here are 4 units of the 7 units I have, 3 in good working order and the one to the far right you will see later in the Yupiteru club chamber of horrors photos “example 1” and “example 2”.
Note the photocopy of the original manual very kindly sent to me via snail /postal mail by a Japanese owner and self confessed Yupiteru fan.
Thanks so much for sending this through Japan Post overseas service Yuuto San from Sendai City, Miyagi Prefecture, Japan.
(Incidentally, Yuuto 佑人: Ironically translates to “Person who Helps” in English..very apt !), It is Very much appreciated, a very kind gesture !
You may think that this user manual would be of no use to an English speaking owner but I have referred to this many times, there are excellent illustrations in this copy and my Japanese has come on leaps and bounds since receiving it !

I appreciate all comments to my blog pages but I have received quite a lot of communications from enthusiasts in Japan and this is fantastic because plane spotting is encouraged so it is not unusual to see lots of spotters with their radios on the viewing terraces at airports in Japan. Security do not discourage use of airband radio unlike other places and there is a large following of the hobby of radio generally..this is great !
If any more avaition spotters/Yupiteru owners from Japan want to get in touch, please use the comments box at the foot of every page on my blog.
I have had a lot of readers correspondence worldwide regarding a previous repair on one of these Yupiteru Scanners in my blog post here
http://www.merseyradar.co.uk/airband-radio/scanner-greats-yupiteru-mvt-7000-brought-back-to-life/
Be sure to check out that page.
History
Arriving to the market in the very early 1990s it set the bar so high in technical terms that the competition were blown clean out of the water.
So much so, the competition didnt even try to compete such was the level of excellence achieved by engineers at Yupiteru.
Everybody has heard of the more popular MVT-7100 but i was the much earlier MVT-7000 that changed the scanning hobby forever.
In the market of the day AOR/Fairmate had their HP100/200e which had a terrible user interface (an AOR trait in their hand held units which continued on and on for decades),..Icom had their more expensive R1 receiver (I nicknamed it the chocolate eclair of scanners..lovely to look at but very little good inside !) which looked nice enough but was truly awful as it received everything else except the intended frequency.Sony had the Air 7, nicely made, very very expensive and very limited in coverage.
By the time 1993 came along, Yupiteru had a line of receivers to suit every budget and need. Every last one of them was excellent and they sold in droves worldwide.

Diagnosis
On to this particular MVT-7000, this one has been with its owner for 28 years or so. The owner purchased it from new along with the original OEM soft pouch case accessory which is still in use. Rare item !
(Also, some vintage early 1990s frequency guides feature in the photo)

The owner had said that the unit stopped working all together and sent the unit to me so I could have a look.
Here is the issue, a real problem with the MVT-7000 was the thickness of the plastic used in the lower 50mm of the casing around the battery compartment.
As the batteries are inserted, the metal terminal post tangs are forced outwards to the sides of the radio. The plastic casing is very thin and it eventually splits causing the terminals to lose contact and the radio dies with no functions possible.
Some users squeeze the cracked sides back together and this makes the radio work again but also makes the cracking worse until a point where disaster will strike and a chunk of casing will fall off and that makes one very dead radio and a nightmare of a repair job.

As you can see above, there are smaller micro cracks to the left of the main fracture in the case.

The other side, same story but this time the micro cracks are to the right of the main fracture.
The battery bay
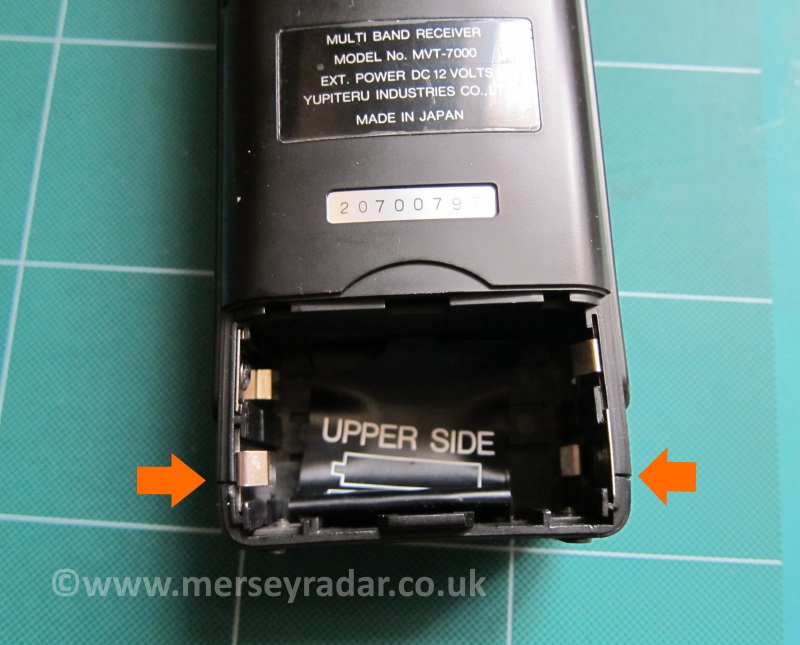
If left any longer, a whole chunk of the lower case could have come free and broken away which would make repair almost impossible but thankfully I have caught this one just in time to save it I think.
Just in case you were wondering what disaster really looks like, well here it is in its full form.
Yupiteru fans have full permission to look away now or sob uncontrollably. Here is the Yupiteru sick bay, very sick actually !.
Example 1.

Not a thing to relish repairing or even attempting come to that. What a sorry sight and what a nightmare to repair !
Note also the rotary encoder has self destructed probably due to overzealous easing apart of the 2 halves. Very fragile area of the radio, Easy mistake to make.
This radio will need serious work to get it going again,with parts being scarce it is doubtful that it will ever scan the airbands ever again. How sad is that ?
Can you help with casing parts ,encoder and buttons ? Perhaps you have a donor 7000…Please get in touch via comments at foot of this page.

Another radio of the same model and another “Tale from the Crypt”, and yes another very graphic example of what Yupiteru MVT-7000 disaster really looks like.
Example 2.

A piece has broken free from the battery terminal area right in the corner of the casing in this example but not so easy to repair as the user did not refit the battery cover and use an elastic band to secure it immediately. This may have stopped things getting much worse.
Instead, they carried on using it and the good old MVT-7000 soldiered on and on for its owner not even breaking a sweat getting dragged around every weekend to the next spotting venue on the list rain or shine, and a fair bit of travel for some overseas spotting thrown in for good measure.The case has lost rigidity at its weakest point and constant flexing/twisting of the radio in use, hot and cold weathers out in the field has caused stress fractures starting at the side of the unit going all the way along the front of the radio following a very easy path of “least resistance” (the speaker grille slots)…With no spare case mouldings available from Yupiteru (all stocks were exhausted some 15 years ago), A truly daunting prospect to even think about repairing. A radio that still works perfectly well believe it or not but after 30 years of loyal service, a piece of Yupiteru history is self-destructing right in front of us..Too good for the donor scrap parts bin, too bad to pass on to a new owner, I use it for bench testing only now and it will be with me until it finally gives up the ghost. What a sorry sight this is ! .
On to the repair.
I used loctite superglue to work into the cracks widening the biggger cracks first (Yes That IS Very scary indeed) so the adhesive worked its way right down inside then clamp shut back to shape for at least 10 minutes.

The knobs were removed from the top of the radio, then remove the threaded securing collets.

The potentiometers and rotary encoder are very fragile when the collets are removed. These can be easily damaged or worse they could break clean off the circuit board underneath, take great care from now on. (Amazing how clean this is for a close to 30 year old machine).

After carefully removing the lamp/contrast/key lock/reset panel bezel we can split the radio into its two halves.
Note the sticky contact adhesive for the bezel panel, all this has to come off later.

The radio is now apart, Now really guys, the photo doesnt do it justice but take it from me.. it is absolutely pristine condition inside, no corrosion at all.
Just like a brand new factory radio 30 years on, an absolute credit to its owner ! It has been well looked after. Electronically its absolutely faultless,and not a speck of dust anywhere to be seen, even under close inspection with a 15x jewellers loupe, faultless,not a mark or a smidge.. the best example I have ever seen.. Wow !
A real “Yupi beauty” !
Lets make good and repair those nasty cracks (and micro-cracks) but Im a little scared now due to the condition of this radio, it would be a crying shame to mess it up.

And the other side

I left the glue for 1 hour to dry out fully then sand down with 200 grit paper first and move down to 600 grit fine, then finally 1000 grit superfine.
I used the 1000 (superfine) grit paper with Greygate Plastic Polish used by N.A.T.O forces to polish fighter cockpit perspex canopys.
I have had a 100ml bottle for about 10 years, a little goes a very long way, there is no better product for this job.

For reference, heres the product.

And here are the results,
One side

and now the other side,

Yes there are slight bumps but these will buff out on a final polish when I get the radio back together again.
A big improvement though compared to photo number 2 and photo number 3 at the top of this post I think you will agree.
Anyway, lets finish up.
We have to get all of that awful contact glue out of the bezel recess,it is horrible stuff, this takes a long time, keep working at it with a toothpick making sure no stray blobs go inside that lovely radio.

One thing I noticed when first looking at the radio was the volume knob was very loose, often it would fall off in use and I had to pop it back on to the shaft.
I tried flipping the knobs around but same result so I came up with a solution, by making a small shim made from card,shown by the orange arrow (its very small and took a few attempts to cut correctly) I applied this to the flat of the volume potentiometer and popped the knob back on top.

All is well and now the knob stays firmly in place…another job complete.
Now I boxed up the radio and tried it out.

Looking Good !

The radio is in excellent condition, should last many years to come.
One of the all time scanner greats, what a machine !
This will be winging its way back to its owner next week and I know they will get many more years of happy listening from it.
This radio has a beautiful rounded tone and great ergonomics , it can hold its own against any, and I mean any handheld model in todays market which is amazing when you consider this model is nearly 30 years old.
That does tell you how far ahead it was of anything else that was out there at the time, no gaps coverage from 8mhz right up there to 1300mhz with lots of step/mode options, absolutely stunning !
A piece of scanner history, the mighty MVT-7000, The undisputed King of Scanners … the one that started “Yupi mania”.
Thanks for reading.
To close this post, some memories received by another MVT-7000 owner.
To set the scene, Imagine a small village in the Welsh Valleys where coal mining was the main industry,a very hard life but the villages had a great sense of community spirit. Everyone knew each other. Generations of those families worked in the coal mines. When the mines closed in the early 1990s there was very little to do but they stuck together as ever.
“My 7000, I bought in 1993 with some redundancy money, I still have the receipt here somewhere and I think I paid £250. I loved that radio it went everywhere with me, cycling, camping, up the pub, you name it and I took it there. Times were very different then of course as you could listen to all sorts of stuff like mobile phones and the Police, ambulance, fire and well just about anything and everything! We used to have ‘Mobile Phone Parties’ on a Saturday afternoon at my grans house.
Her kitchen was packed with mostly relatives but some neighbours as well and I had programmed most of the mobile phone node frequencies in to the 7000 and just scan them all afternoon. It made for incredible listening and sometimes we would hear a voice that we recognised and the gossip level was on %100!”
“My 7000 certainly had a very hard life. In the mid 90’s myself and a few friends (also no longer working) and their children, decided to complete a 2 week long cycling and camping trip in the Brecon Beacons.We did this for charity and raised a few hundred pounds to help towards sending some disabled children on holiday.Now the weather is very changeable up in the Beacons and the poor old 7000 got soaked through more than once and in fact I accidentally left it outside the tent all night on one occasion!
I should not have worried though as after the water had been shaken out, all seemed fine !”
I have received some requests for a readable manual / user guide, I found a nice video by youtube user “26CT1094” explaining basic functions , thanks for this.
[…] http://www.merseyradar.co.uk/airband-radio/another-yupiteru-mvt-7000-scanning-legend-repaired/ […]
I am the owner of the Yupiteru MVT-7000 Mike has just repaired and this morning it arrived back home ready to use again. I can’t thank Mike enough for doing this as so many memories were made using this receiver at locations not just around the British Isles but abroad too. His comments on the condition of it justified the love and care given to it over nearly 30 years. I had almost resigned myself to face the fact that the Yupiteru was not going to function again and then I found Mike’s Blog and there was a MVT-7000 he’d repaired – I got in touch and the rest is history written in his Blog. Thank you Mike
I have a 7100 was trying to put a discriminator tap on it but never got round to it.
It’s in bits at the moment, how much do you charge to rebuild it ?
Sorry I do not take on repairs normally, this was an exception.
I can suggest Graham at his website http://www.radiocruncher.com , he can accommodate your requirements Im sure.
Thanks for your interest.
Very nice write up. Made me go dig out my 7000. Found the photocopied english language manual that the shop in Japan provided. Thanks for the memory trigger, dusting the radio off to program it up.
I have a yupiteru mvt-7000 and am trying to input the frequency for Manchester ATC.
How is this done as I am a newbie at this ?
Hi Tony, I have included a short video guide from youtubeon how to program frequencies into this scanner.
See the bottom of the page.
For airband Make sure you set the step size to 5 khz and receive mode to AM.
For Manchester Airport (EGCC) I can give you a few frequencies to get you started.
Approach 118.575 or 118.580, 121.350 or 121.355, 135.000 or 135.005
Tower 119.400 or 119.405, 118.625 or 118.630.
Ground 121.700 or 121.705 , 121.850 or 121.855.
Good Luck Tony and enjoy your scanner !
I have several scanners Uniden, Radio Shack, Yupiteru. The Red Arrows and Thunderbirds were flying past today which turned out to be bit of a flop. (It wasn’t clear where they were going to be and we guessed wrong). I did hear some of the formation commands on UHF (242 or 243.45).
In trying to prepare I wanted a scanner with likely frequencies. My goto scanner is a uniden BCD436HP with trunking and P25 digital but is so complicated and takes forever to setup. Thought I’d use one of my old models. I later realised that the only one with UHF Military frequencies was the MVT-7000. Fired it up after years of abandonment and it came on fine. Later discovered that it lost it’s capacity to remember things though.
A google search showed a you tube video of a capacitor replacement in an MVT-7100, then more searching and I found your site. Interestingly my model has some of these issues – broken catch on the battery cover (don’t even know where it is now) and cracking around the battery holder.
So, going to add a capacitor replacement to my projects and then if that works OK, maybe I’ll try fixing the cracks.
Hi Bryan and firstly thanks so much for dropping by my blog pages. So good to hear of another mvt-7000 sitting there unused saved your spotting day against more modern scanner models costing substantially more.
Such a great machine. I would wager you are glad you kept it.
Memory Capacitor sometimes called a “super capacitor” (do t know why..it is anything but) is not so hard to do but remember it’s double sided PCB board and you will need lots of heat delivered quickly from a good iron.
More worrying is You say there are cracks in the casing, be very careful Bryan on disassembly or you can write off the radio for sure. Easy does it.
I don’t employ advertising on my site, it’s there to share knowledge and experiences with other enthusiasts. I do appreciate each and every person who sends in their comments, this will help others.
Glad you found my blog pages, thanks again for checking in.
There will be more radio adventures/ramblings very soon.
Mike
Hi I h!v a Jupiter vt125ii which will only send audio via headstones or separate speaker do u know what speaker I need to replace with. Thks ken
Hi Ken, I dont have vt-125 but Some tower PC system error beep speakers seem the right diameter, also door intercoms have similar.
If you are in the UK , You may want to look at these too, they are cheap enough to try one out
The difficulty is getting one with a lower profile magnet so it will fit.
CPC Farnell have miniature speakers too.
I have the Yupi 3300, 3300Eu and the 7100, all great radios. After reading these reviews posted here, I think I’ll try the 7000 too !
Rick Somers
Redding, CA USA
Hi Rick,
Thanks for your visit.
Seems like you are a fellow Yupiteru fan, You should try the mvt-7000..if you can find one ! its slightly better than the fantastic 7100 on AM for the civil and military aircraft band and also slightly better on the marine & 2m amateur bands. The iconic 7100 is much better than the 7000 on lower frequencies though.
The 3300 series are also good performers and they rarely have casing split issues but the cheaper models have limitations with regards to wideband receiving.
Thanks again for dropping by.
I’ve just found my fathers Yupiteru MVT-7300EU that he got a lot of enjoyment from so thought I’d have a go. I put new batteries in and a clock counter came up counting from 1 minute and now at 21.58 hours. I can’t even get it to turn it on but I don’t know why, so all I’ve got is a time counter !! Do you think I should get it serviced or am I missing something completely !!
Hi, Sounds like the timer function is enabled on your MVT-7300
Check this link
https://www.libble.eu/yupiteru-mvt-7300/online-manual-791870/?page=0046
Hope this resource helps you. Thanks for your visit to my blog pages.
Hi the light on mine stopped working ,is there anyone who can fix this …as i am a bit ederly and the fingers are all thumbs now . any help would be much appreciated
thanks
George
Hi George,
I can recommend Graham “Radiocruncher” for repairs.
Hi, Very interesting video, thanks for posting that. I have a 7000 which needs it’s “super” capacitor replaced. Is it the same capacitor as the one in the 7100?
Regards,
Redcon5
Hi Redcon5,
The capacitor is a 5.5v 0.22uf like this one Pana EECS0HD224H
another source in the UK is Rapid Online
Good Luck and thanks for your visit.
Thanks for your quick reply. Sorry, confused. Perhaps your reply did not come out as intended? The capacitor is a 5.5V 0.22uf like the one in the 7100?
You also type “another source”. Was that meant to be a hyperlink?
Thanks for your help!
Hi Redcon5 ,
Yes I think the 7100 is same capacitor.
You can get the capacitor swap done by Doug Knight @ Knights CB in Lincolnshire for around £23 GBP.
Hello,
I purchased my 7000, boxed new, at the RAF Finningley Air Show perhaps thirty years ago. I went a little bit Viv Nicholson and also shelled out for the genuine leatherette Yupiteru case. It was in remarkably good condition when I looked at it recently, possibly due to being stored without batteries. The serial number starts 20601……, which might indicate the date of manufacture. 199(2), week (06) perhaps? I find the comments about the instruction manual interesting, as I’ve still got the original, printed manual, in English. It was in the same bag as a leaky chicken Madras take-away, so got a little oily. I’ll bang some batteries into it and if it works, look for a 12v 200ma external power supply.